
So you just got your first AR-15 and went out to practice shooting with it. Now that you’ve gone through a few boxes of ammunition, it’s time to take your new weapon home. But what happens after that?
You know you’ll have to clean your AR-15, but you don’t know how. Perhaps you’ve removed your upper and lower receivers by pulling the pins. But what do you do now?
It may appear to be a difficult, even perplexing undertaking.
It isn’t, thankfully. We’ll teach you all you need to know about maintaining and cleaning your AR-15 in our AR-15 cleaning guide.
When you’ve finished reading this, you’ll be able to disassemble your pistol, clean it thoroughly, and reassemble it with ease and satisfaction.
How to Clean an AR-15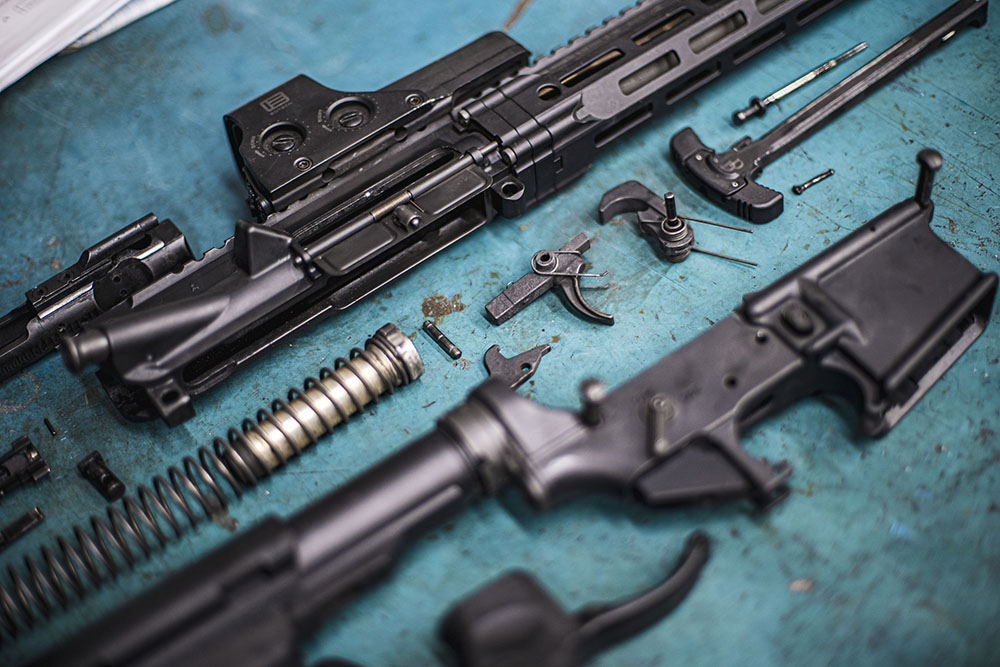
Remove Ammo, Magazines, and Clear The Rifle
There’s a reason this is the first step! Too many mishaps occur when guns are being cleaned, therefore be sure the rifle is empty of all ammunition. Magazines and ammunition should be kept out of the cleaning area, preferably in a separate room. Before moving on to the next stage, inspect the rifle’s chamber visually and manually once the ammo and magazines have been removed from the region. You can see which are the best ar-15 cleaning kits to assist you during cleaning your gun.
Separate Upper & Lower Receivers
The bolt and hammer can be released once the rifle has been declared clean. Because the upper and lower receivers cannot be separated with the bolt back and hammer up, this step is critical.
The front and rear takedown pins that hold the receivers together will be removed from here. Begin with the back pin, which should be pushed out of the way. The upper receiver as a whole should tilt upwards. The front pin should then be pushed out and removed. The top and lower receivers should simply separate once both pins are removed.
Remove Bolt Carrier & Charging Handle
The bolt carrier should easily fall out of the upper receiver’s breech. Make absolutely sure you don’t drop it and that no parts come out when you’re removing it.
After that, the charging handle is removed by moving it to the back and then directing the front section through a predefined broad location to liberate it from the upper.
Clean Barrel & Upper Receiver
Remove grease and grime from the upper receiver using a rag, taking care not to harm or plug the gas tube while doing so. Remove any carbon buildup you come up along the route.
Place the upper receiver assembly in a strong and stable position after installing the bore guide into the receiver. Pass the cleaning brush through the bore of the barrel from breech to muzzle with a solvent-soaked patch. Depending on the amount of friction caused between the brush and the bore, this may require considerable effort.
Rep until no contaminates are visible in the patches coming out of the muzzle. Once the bore is clean, slide another patch through it, this time saturated in gun oil, to lubricate and preserve it.
Clean the chamber and barrel extension with a rag or a chamber brush to remove any carbon or debris.
Disassemble & Clean Bolt Carrier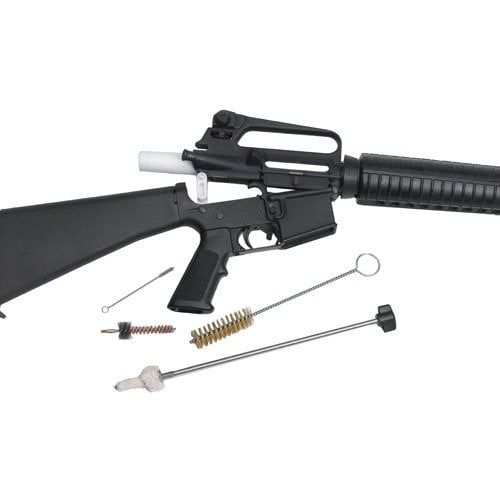
Remove the cotter pin with a tiny tool, such as an Allen wrench, and tuck it away to dismantle the bolt carrier. Allow the firing pin to fall out of the back end of the carrier once the pin has been removed. With the cotter pin, set aside. Remove the firing pin and twist the cam-pin 90 degrees so it sits at the bolt’s 11 o’clock position. Take it out of the bolt carrier. The bolt can be pushed out of the front of the carrier after the cam-pin has been removed.
Check for carbon buildup, abrasive wear, or damage on the bolt, spiral gas rings, firing pin, and cam pin. Finally, look for any accumulation or wear and tear on the carrier itself. Check that the gas tube screws are snug and, if necessary, still anchored.
After all parts have been cleaned and examined, lubricate the contact points with a light application of gun oil and reassemble.
Before reassembling the upper receiver, clean the charging handle with a rag and lubricate it with gun oil.
Clean & Inspect the Lower Receiver
Wipe any excess filth from the receiver using a rag. Dirt and carbon can collect in the magazine well’s low places, so clear these out as well.
Make that all springs, keepers, and pins are still in place before inspecting the trigger mechanism. Remove any lubrication or residue that has accumulated. The trigger well is the low region inside the rifle that will capture the majority of the junk that flies around during shot strings, so clean it properly.
Ensure that the safety features are working properly and that any debris that could cause it to malfunction is removed.
Examine the magazine release for good operation and clean away any debris or pollutants that may obstruct it. Make the same adjustments to the bolt catch, ensuring that it pivots freely. Before reassembling, clean any accumulation and lightly oil it.
Depress the detent with a tiny tool to remove the buffer from the buffer tube. Check for any damage or impurities on the buffer and spring. Clean the inside of the tube by removing any debris or buildup and wiping it down.
Prior to actually reassembling the weapon, reinstall the buffer and lubricate all locations on the trigger assembly and any other moving parts you may have overlooked.
Lubricate & Reassemble The Rifle
In the upper receiver, reinstall the charging handle and bolt carrier. Ensure that the bolt carrier is fully forward and the bolt is in the battery. It’s also crucial to make sure the hammer is back and secured by the sear.
Assemble the two receivers and hold them tightly together while reinstalling the takedown pins.
Test The Weapon
Now that the rifle has been cleaned and reassembled, it’s time to put it through its paces. Check the safety to ensure that all positions are properly rotated. Pull back on the charging handle to ensure that it travels all the way to the back without any stops or tight areas. The bolt carrier should slam shut entirely into the battery after you release the charging handle.
Point the AR in a safe direction and pull the trigger to check the trigger function while the rifle is still empty of bullets. Hold the tripped trigger to the back and reload the weapon to ensure the trigger resets properly. It’s time to reset the trigger.
The rifle is ready to be stored provided everything functions properly. If you are interested to learn about the best gun cleaning products please check our review on the best rifle bore cleaner.

Hi, I am Jerry L. Miculek and I am experienced firearms and optics expert. Guns are not just a hobby for me, they are my passion and life. You can learn more about me on my About page.